Introduction:
This
guide will walk you through the process of integrating Angular with SharePoint
Framework (SPFx), ideal for developers aiming to build dynamic applications
within SharePoint. You'll learn how to set up the environment, configure
Angular with SPFx, and deploy your application. This setup enables you to
leverage Angular's capabilities while working within the SharePoint ecosystem.
Prerequisites:
Ensure that the following software and tools are installed:
- SharePoint SPFx Environment: Set up the SharePoint SPFx environment. Follow the official guide here: Microsoft SPFx Setup.
- Node.js : Install Node.js version 18.
- Angular CLI: Install Angular CLI globally using: npm install -g @angular/cli
Note: Running `npm install -g @angular/cli` will install the latest version. To
specify version 18, use `npm install -g @angular/cli@18`.
- Code
Editor:
Install any code editor of your choice. Visual Studio Code is recommended for ease of use with SPFx.
Steps to Create an SPFx Application with Angular
Step 1: Create an Angular Workspace
1. Open PowerShell (or an alternative command line) and navigate to your desired directory (e.g.): cd "D:\AKS\SPFX\Demo_spfx_ang"
2. Create a new Angular application using the command: ng new ang-app
3. When prompted:
- Choose a stylesheet format: Select `css` (or your preferred option).
- - Enable Server-Side Rendering (SSR) and Static Site Generation (SSG/Prerendering)?: Select `N`.
4. The command will install the required packages and set up your Angular solution. Ignore any Git configuration errors.
5. Once installation is complete, open your project in Visual Studio Code: code .

Step 2: Add Angular Elements
1.
Open the terminal in Visual Studio Code and navigate to your Angular project: cd ang-app
2. Install the Angular Elements package: npm install @angular/elements@latest
3. Test the Angular Application :ng serve
If the application loads successfully in the browser, your setup is correct.

*Note: Angular will generate additional files (e.g., `polyfill.js`, `main.js`, `styles.js`) during build, which are required for SPFx.*

2. Create a new SPFx web part using the Yeoman generator: yo @microsoft/sharepoint
3. When prompted by Yeoman, configure as follows:
- Component Type: WebPart
- Web Part Name: Choose a descriptive name for your web part.
- Template: Select 'No framework.'

5. Open the root folder in Visual Studio Code: code .
Step 4: Configure Angular to Work with SPFx
Modify angular.json
Create an
appfilesfolder in the SPFx web part project (spfxAppWebPart).In
angular.json(in the Angular project), update theoutputPathto:This change will ensure required files (
polyfill.js,main.js,styles.js) are compiled into theappfilesfolder.Change
outputHashingto"none":This prevents adding unique hashes to filenames, so you won’t need to update file references in SPFx every time you rebuild the Angular project.
Increase the
budgetsformaximumWarningandmaximumErrorif necessary (optional):This adjustment helps avoid errors if the project exceeds default file size limits.
So Overall changes in the angular.json will be as follows:


Modify main.ts
Update main.ts to define Angular components as custom elements:
import { createApplication } from '@angular/platform-browser';
import { createCustomElement } from '@angular/elements';
import { appConfig } from './app/app.config';
import { AppComponent } from './app/app.component';
(async () => {
const app: ApplicationRef = await createApplication(appConfig);
const appComponent = createCustomElement(AppComponent, { injector: app.injector });
customElements.define('app-root', appComponent);
})();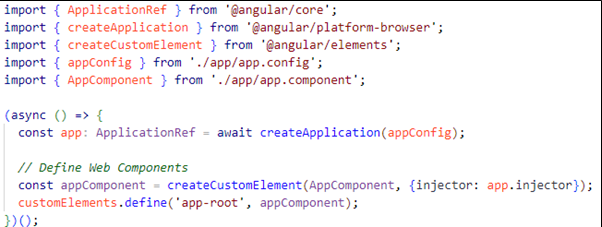
AppComponent with your default component if it differs.
Step 5: Integrate Angular with SPFx Web Part
Import Angular Files in SPFx
In the Webpart.ts file, add the following lines to import Angular styles and scripts:
Order matters: Ensure these files are imported in this exact sequence.
Render the Angular Component
In the render() method of Webpart.ts, add:


Step 6: Testing the SPFx Application
Trust the Developer Certificate
Change to the SPFx app directory and run: gulp trust-dev-certThis step adds SPFx’s certificate to the trusted authorities on your machine.
Change the {tenantDomain} with your SharePoint online site url.

Serve the Application : gulp serve
This will compile the solution and launch the SharePoint Workbench. Add the new web part to the Workbench to verify functionality.


Conclusion
Following these steps, you’ll have successfully set up an Angular application within the SharePoint Framework. This setup provides the flexibility to use Angular features in SPFx and offers a straightforward path for developing complex SharePoint solutions.
Cheers and happy coding!😊


